For as long as I can remember, my mother would make an assortment of Libyan sweets for the Eid holiday. Baklawa, gharayba (butter cookies), graynat (crescent shaped almond cookies), kaak (a crunchy cookie with a hint of salt), basboosa (semolina cake with honey) and magrood! However, magrood was extra special because they only time she would make it was at Eid. It is my absolute favorite dessert for 30+ years. I will pass up birthday cake, ice cream, and cheesecake for a single piece of magrood.
I think my love for magrood is wrapped up in nostalgia. There was never an Eid holiday without magrood in our house and making them became a ritual. My mother would prepare and shape the cookies; I would decorate them. This was usually a 1-2 hour process and we would sit across the kitchen table from each other, usually late at night, and chat about anything and everything as we made a huge batch of magrood cookies. Although I have other siblings who could have joined us, this tradition belonged to just the two of us. For years, I cherished this mother-daughter Eid tradition. And every time I eat a piece of magrood, I still remember the simple joy of all those evenings with my mother over the years. To me, magrood tastes like laughter and my mother’s love.
Now that my mother and I live in different countries, I have to make my own magrood. Every time that I sit down to make them, it feels lonely. I’m pretty sure that magrood is not meant to be made alone. In an attempt to keep our ritual alive, I send my mom a Snapchat of my tray of magrood before I put it in the oven. And she sends me a Snapchat of her tray, too. It’s our new 21st century Eid tradition.
Ingredients (makes 60-65 pieces):
For the Magrood:
- 4 cups semolina flour
- 1 cup all-purpose flour
- 1 teaspoon baking powder
- 1 cup canola oil
- 1 1/2 cups warm water
- 1 cap of orange blossom water (optional)
- 1 lb date paste
For the honey syrup:
- 2 cups sugar
- 1 cup water
- 1 Tablespoon lemon juice
- 1/4 cup honey
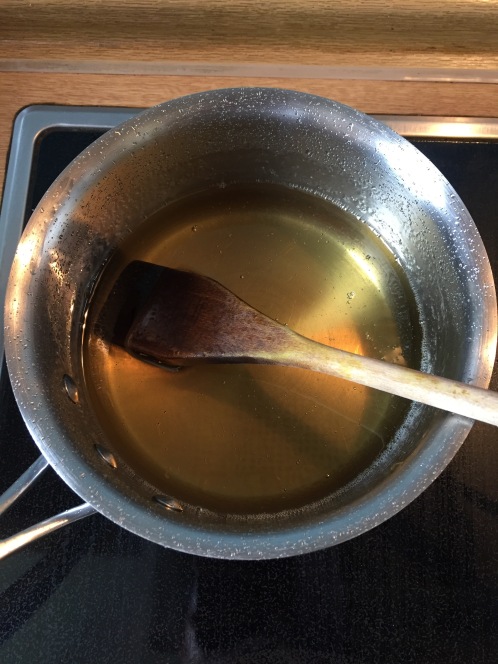
Start by mixing the semolina flour, all-purpose flour and baking powder in a large bowl. Heat the oil in a pot on the stove until it is hot, but not boiling!


Very carefully and slowly pour the oil in to the flour mixture. Mix it well with a wooden spoon, then cover the bowl with foil and set it aside for at least 1-2 hours. This will allow the flours to absorb the oil.


After your flour mixture has rested for 1-2 hours, it is time to make the magrood! Preheat your oven to 350F (or 170C). Heat up a small pot of water with approximately 1 1/2 cups of water. You want the water to be warm, not boiling. While the water is heating up, prepare the date paste. If you have never used date paste before, it’s usually a rectangular package of mashed dates that looks like a brick. It’s much easier to use in baking than removing the pits from dates and processing them in a food processor. You can usually find date paste at Middle Easetn stores, on Amazon and at some health food stores since it is commonly used in vegan baking. Open the package of date paste and take out a chunk the size of your hand. Roll out the date paste into a long strand ((6-8 inches long) about the thickness of your thumb. If the date paste is hard to work with, knead it with a tiny bit of olive oil. Make several strands of the date paste and set them on a plate.

Now let’s set up the work station. I like to sit down at the kitchen table for this since it is time consuming. At your work station, set out a large sheet pan (your sheet pan must have edges), a large cutting board, an empty bowl, a straight-edged knife, a ladle, the flour-oil mixture and the plate of rolled out date paste. You will also need what is called a “mengsha,” such as this one:

I got my mengshas in Libya and my amazing mother also found them available on Amazon! So you can easily buy them online. Back before Amazon existed, my mom used to make her own out of tin can lids and some heavy duty scissors, but it was always a bit dangerous since they have sharp edges and you have to file them down.
Once the water is warm, but not boiling hot, remove it from the stove and take it over to your work station. Place the ladle in your warm water. If you like the taste of orange blossom water, you can add a capful to the warm water. It is now time to start making the magroods. Here is my setup:

To start, take approximately 1/5th of the flour mixture and place it into the empty bowl. Just eyeball the 1/5th of the mixture, you don’t have to divide it into 5 exact portions. Add a little bit of the warm water to the flour mixture, start with about 1/4 cup of water. My ladle has measurement lines, so it’s easy for me to measure out. You could also use a 1/4 cup measuring cup. Mix the flour and water until it starts to form a dough. It should be soft, smooth and easy to shape when it’s ready. If it still seems sandy and falls apart when pinched, add a tiny bit of water (a teaspoon or so) at a time until the consistency is better. It should hold its shape when pinched and not come apart like wet sand. It’ll also become a lighter color than the “dry” flour mixture. When I squeezed my dough, it held its shape and you can even see where my fingers were:

Take the dough and form into an oval-ish/rectangular shape in your hands. Place it on the cutting board and knead it slightly to elongate it. Then press an indentation into the center of the dough:
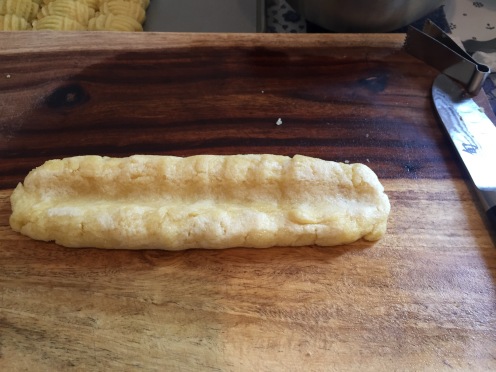
Place a rope of the date paste, pinch off the edges if they are too long. Then gently pinch up the edges of the dough around the date paste to enclose it. It’ll be lumpy looking, which is fine.


Now, gently pat across the top of the dough using three fingers to help smooth out the top, then roll it onto its side. Pat it down again with your fingers, rotate slightly again. Repeat this until it is smooth. Imagine that you are trying to make a square or rectangular-shaped log out of play-doh, that is how you should rotate and shape it. You’ll notice that the third image below has what looks like finger-waves across the top thanks to all my finger patting.

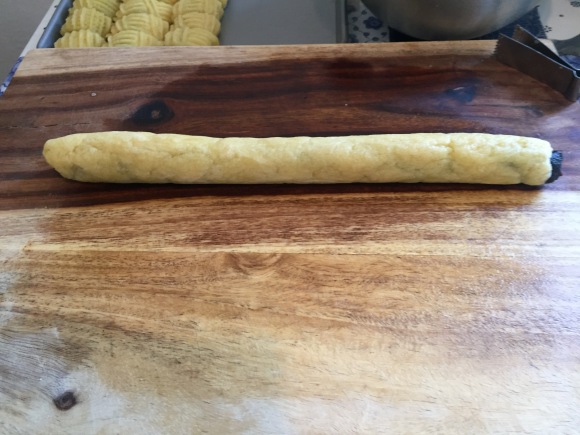

When it looks relatively smooth, cut off the edges at a slight angle and slice the whole roll into 1-inch or 1.5-inch pieces.


Gently pick up each piece and using your palm, thumb and forefinger, smooth down the cut sides. Also slight roll the top of the magrood against your palm to smooth it out. Place the piece down gently and repeat until you’ve smoothed and shaped each piece.


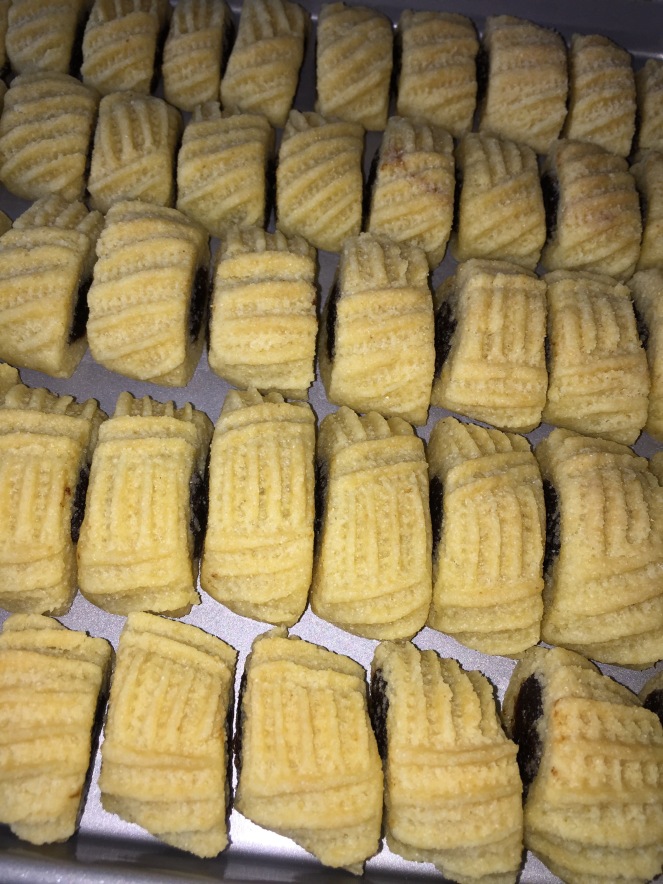
Now it is time to use the mengsha (or fork) to decorate each piece. This was my job when my mother and I would make magrood each Eid. I used to try to come up with different patterns. Each magrood was as unique as a snowflake. 🙂 Gently push the mengsha into the dough, starting at one end and slowly pinch the dough until you get a raised edge. Don’t pinch too hard or pinch the mengsha all the way closed or you’ll pull out a chunk of dough. Repeat across the entire surface. You can alternate a few horizontal pinches with a few vertical pinches. Or be crazy and do some diagonal pinches! If you had to use fork for this step, prick a few rows across the top of each piece. After you finish decorating each piece, place it into the pan. Feel free to crowd the magroods in the pan, they won’t stick together when baked.


Repeat the whole process until you finshed the dough and your pan is full. As a I mentioned, crowd the magroods in the pan since they won’t stick together. Apparently, crowding them is the traditional way to place them in the pan. My mother insisted that they must bake this way. My magroods are practically touching:
 Place the magrood into the preheated oven. They should bake for approximately 30 minutes or so. The top of the magrood will be slightly golden when they are ready. We are not done yet! While the magrood is in the oven, we have one more task.
While the magrood is baking, we need to make the syrup. Place 2 cups of sugar into a pot and add 1 cup of cold water. Add about 1 Tablespoon of lemon juice and stir it well. Turn the stove to high and when it starts to boil, reduce the heat to medium and set a timer for 10 minutes. After 10 minutes, remove it from the heat.


Allow it to cool for 5 minutes, then mix in 1/4 cup of honey. Eyeball the honey, it doesn’t have to be exact. Stir in the honey and the syrup should be a lovely golden color now.
By now the magrood should be ready! Both the syrup and the magrood need to be hot for the next step. If the syrup has cooled too much, heat it up for a minute or two so it is hot (but not boiling). Take several pieces of the hot magrood (use a fork or small tongs) and place them top side down into the syrup. Allow them to soak up the honey for about 1 minute, then flip them over and allow to soak for another 45 seconds to a minute.


Then carefully remove them and place them back into the same baking pan. Immediately sprinkle the wet magrood with sesame seeds while the syrup is still hot, otherwise the sesame won’t stick. Repeat until all the magrood has been soaked and topped with sesame seeds.


If you still have some syrup left over, drizzle it over the magrood. Don’t worry about covering them completely, they are going to sit in the pan for hours in order to soak up all that syrupy goodness. The magrood need to sit in the pan in their own puddle of syrup for a minimum of 8-10 hours before you move them to an airtight container. I actually prefer to leave them overnight, so they get about 10-12 hours of soaking time. Serve with a hot cup of tea. I hope you love them as much as I do!

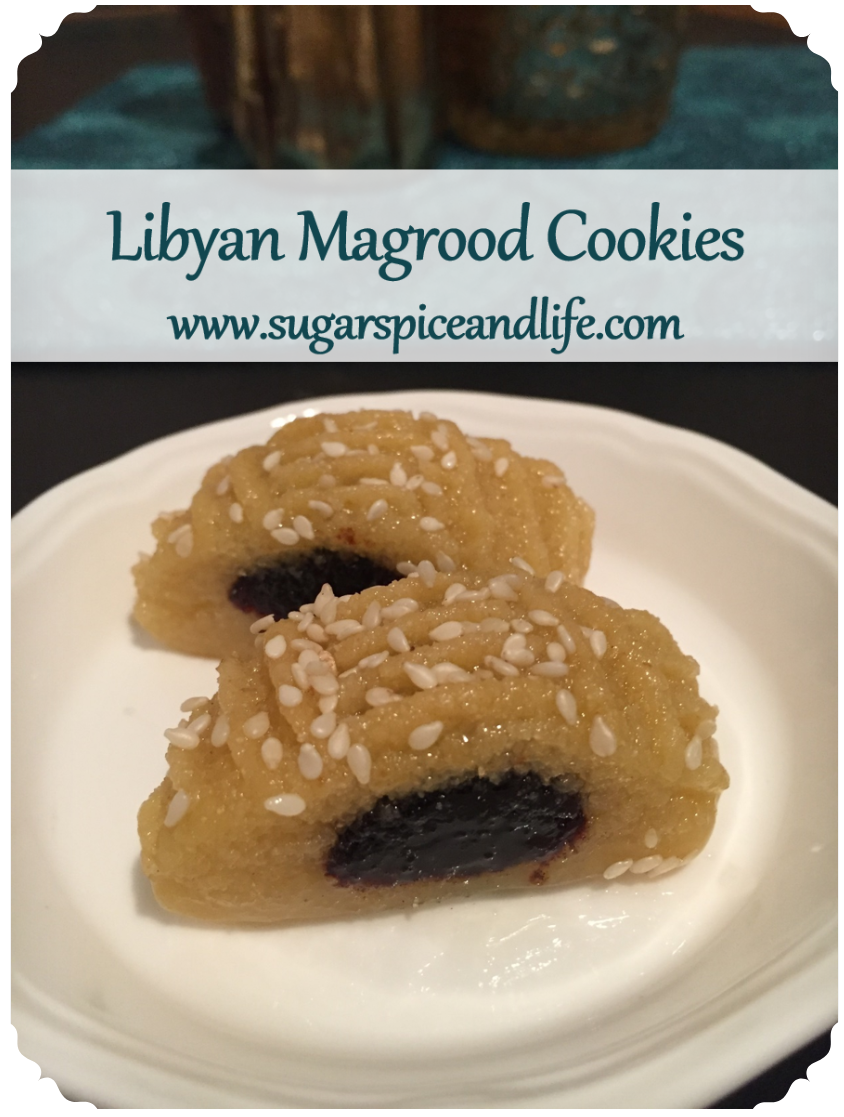
Libyan Magrood
Magrood is a delicate semolina cookie stuffed with dates, soaked in a honey-syrup, and sprinkled with sesame seeds. It melts in your mouth and is perfect with a hot cup of tea.
Ingredients
For the Magrood:
- 4 cups semolina flour
- 1 cup all-purpose flour
- 1 teaspoon baking powder
- 1 cup canola oil
- 1 1/2 cups warm water
- 1 cap of orange blossom water (optional)
- 1 lb date paste
For the honey syrup:
- 2 cups sugar
- 1 cup water
- 1 Tablespoon lemon juice
- 1/4 cup honey
Directions
- Start by mixing the semolina flour, all-purpose flour and baking powder in a large bowl. Heat the oil in a pot on the stove until it is hot, but not boiling!
- Preheat your oven to 350F (or 170C).
- Very carefully and slowly pour the oil in to the flour mixture. Mix it well with a wooden spoon, then cover the bowl with foil and set it aside for at least 1-2 hours. This will allow the flour mixture to absorb the oil.
- Heat up a small pot of water with approximately 1 1/2 cups of water. You want the water to be warm, not boiling.
- While the water is heating up, prepare the date paste. Open the package of date paste and take out a chunk the size of your hand. Roll out the date paste into a long strand ((6-8 inches long) about the thickness of your thumb. If the date paste is hard to work with, knead it with a tiny bit of olive oil. Make several strands of the date paste and set them on a plate.
- Now let’s set up the work station. I like to sit down at the kitchen table for this since it is time consuming. At your work station, set out a large sheet pan (your sheet pan must have edges), a large cutting board, an empty bowl, a straight-edged knife, a ladle, the flour-oil mixture and the plate of rolled out date paste. You will also need what is called a “mengsha” or a fork.
- Once the water is warm, but not boiling hot, remove it from the stove and take it over to your work station. Place the ladle in your warm water. If you like the taste of orange blossom water, you can add a capful to the warm water. It is now time to start making the magroods.
- To start, take approximately 1/5th of the flour mixture and place it into the empty bowl. Just eyeball the 1/5th of the mixture, you don’t have to divide it into 5 exact portions. Add a little bit of the warm water to the flour mixture, start with about 1/4 cup of water. My ladle has measurement lines, so it’s easy for me to measure out. You could also use a 1/4 cup measuring cup. Mix the flour and water until it starts to form a dough. It should be soft, smooth and easy to shape when it’s ready. If it still seems sandy and falls apart when pinched, add a tiny bit of water (a teaspoon or so) at a time until the consistency is better. It should hold its shape when pinched and not come apart like wet sand. It’ll also become a lighter color than the “dry” flour mixture.
- Take the dough and form into an oval-ish/rectangular shape in your hands. Place it on the cutting board and knead it slightly to elongate it. Then press an indentation into the center of the dough along the entire length. Place a rope of the date paste, pinch off the edges if they are too long. Then gently pinch up the edges of the dough around the date paste to enclose it. It’ll be lumpy looking, which is fine.
- Now, gently pat across the top of the dough using three fingers to help smooth out the top, then roll it onto its side. Pat it down again with your fingers, rotate slightly again. Repeat this until it is smooth. Imagine that you are trying to make a square or rectangular-shaped log out of play-doh, that is how you should rotate and shape it.
- When it looks relatively smooth, cut off the edges at a slight angle and slice the whole roll into 1-inch or 1.5-inch pieces. Gently pick up each piece and using your palm, thumb and forefinger, smooth down the cut sides. Also slight roll the top of the magrood against your palm to smooth it out. Place the piece down gently and repeat until you’ve smoothed and shaped each piece.
- Now it is time to use the mengsha (or fork) to decorate each piece. Gently push the mengsha into the dough, starting at one end and slowly pinch in consecutive rows until you get a raised edge. Repeat across the entire surface. You can alternate a few horizontal pinches with a few vertical pinches. Or be crazy and do some diagonal pinches! After you finish decorating each piece, place it into the pan. Place the magroods in the pan with them touching each other, so you will be crowding the magroods because they won’t stick together when baked and they bake better this way. If you don’t crowd them, they will dry out during the baking.
- Repeat the whole process (steps 8-12) until you finshed the dough and your pan is full. As I mentioned previoulsy, crowd the magroods in the pan since they won’t stick together. Apparently, crowding them is the traditional way to place them in the pan and keeps them from drying out.
- Place the pan of magrood into the preheated oven. They should bake for approximately 30 minutes or so. The top of the magrood will be slightly golden when they are ready.
- While the magrood is baking, make the syrup. Place 2 cups of sugar into a pot and add 1 cup of cold water. Add about 1 Tablespoon of lemon juice and stir it well. Turn the stove to high and when it starts to boil, reduce the heat to medium and set a timer for 10 minutes. After 10 minutes, remove it from the heat.
- Allow the syrup to cool for 5 minutes, then mix in 1/4 cup of honey. Eyeball the honey, it doesn’t have to be exact. Stir in the honey and the syrup should be a lovely golden color now.
- By now the magrood should be ready! Both the syrup and the magrood need to be hot for the next step. If the syrup has cooled too much, heat it up for a minute or two so it is hot (but not boiling). Take several pieces of the hot magrood (use a fork or small tongs to handle them) and place them top side down into the syrup. Allow them to soak up the honey for about 1 minute, then flip them over and allow to soak for another 45 seconds to a minute. Then carefully remove them and place them back into the same baking pan. Immediately sprinkle the wet magrood with sesame seeds while the syrup is still hot, otherwise the sesame won’t stick.
- Repeat step 17 until all the magrood has been soaked and topped with sesame seeds.If you still have some syrup left over, drizzle it over the magrood. Don’t worry about covering them completely, they are going to sit in the pan for hours in order to soak up all that syrupy goodness.
- The magrood need to sit in the pan in their own puddle of syrup for a minimum of 8-10 hours before you move them to an airtight container. I actually prefer to leave them overnight, so they get about 10-12 hours of soaking time.

Oh that looks so yummy. Personally I would pass up cakes for a nice yummy slice of basboosa. Mmmm. Eid Mubarak my friend.
LikeLiked by 1 person
Eid Mubarak! Mmm, basboosa is the best. I was going to make it but my husband isn’t a fan of basboosa! Which meant I’d eat the whole thing myself…
LikeLike
And that is a problem somehow?
LikeLike
Assalamu 3alaikum beauty ~~✨
So I’ve just come across your blog and it’s lovely! Bless your great cooking skills dear :’)
I felt like I had to say hi and tell you how much I truthfully appreciate your wonderful representation of our Libyan cuisine. Do you post your stuff elsewhere? On twitter or insta? If so, please let me know
LikeLike
Hello! Thank you for letting me know how much you enjoy the blog. I have the instagram account setup, but I haven’t started posting
there. I’ll let you know if I get it going!
LikeLike
Reblogged this on Dear Sister and commented:
I am trying this today in preparation for Eid (it’s one of my kids’ favorite sweet) it works well, I might experiment with more keto friendly options for myself.
LikeLike
Salaams, I have attempted to make magrood a few times, but it didn’t quite come out as I wanted. I am attempting your tariqa this time, inshallah it’ll work better, as my kids LOVE magrood, but it’s not always available in stores now that we’re not in Libya any more! Jazakillah khair for this!
LikeLiked by 1 person
Good luck!! I hope it turns out well for you. Keep me posted. 🙂
LikeLiked by 1 person
I’ve made it, but it although it looks ok, it doesn’t taste as strong as the ones I’m used to having. Should I add more honey? Perhaps bake them for longer (the color is quite light as well)?
LikeLike
The color definitely depends on your oven and baking time. I’m not sure which taste you are referring to…the magrood or the honey?
LikeLike
My oven is a bit weak, so I usually add 5-10 minutes to the suggested baking time, but the magrood still came out very light. In Libya, with the gas oven my in-laws would turn on the top fire (broil, sort of), at the end, so I did that, it improved the color a bit, but made it darker at the top than at the bottom. I think I might try baking at 375 next time, and I will let you know. I do believe I need to add more honey, or perhaps some cinnamon to the date paste, because it’s quite bland. What do you think?
LikeLike
Try adding orange blossom water to the date paste or semolina mixture. A lot of bakeries in Tripoli do that.
LikeLiked by 1 person
I did add some, maybe I’ll put more. I’ll let you know how it works out. JAK!
LikeLiked by 1 person
I do not have any date paste, Can I use pitted dates and i blend them in a mixer?
LikeLike
Yes, that should work fine! Date paste is just mashed dates.
LikeLike
Also, if your dates are very dry, you may need to add just a little water to your date mixture when you put them in your food processor. Make sure to remove all pits before mixing, too!
LikeLike
Salam, I made them again, and just wanted to let you know that they came out tasting a lot more like the ones I used to eat in Libya! To get this taste I added two caps of orange blossom water to the water. I also found that if I put too much water they come out very hard, so I’ll have to be more careful about this next time. I baked them for 45 minutes at 375 degrees F, and achieved the color I was looking for. Jazakillah khair for all your advice and for this very detailed recipe, you helped me out a lot! Mashallah!
LikeLiked by 1 person
I’m so glad they turned out so much better this time around, Alhamdulillah!! It makes me so happy to hear that my blog was useful to someone else, thank you for the update. 🙂
LikeLiked by 1 person
Found your recipie and made them today with my daughter. Just had to say how lovely your blog was and the story of making these with your mother ❤️
We used fine semolina but wondered if we should have used the coarser type as they turned out quite hard prior to the syrup going on. They’re still soaking till tomorrow fingers crossed x
LikeLiked by 1 person
I’m so glad you enjoyed the blog! I generally use fine semolina. They will soften up as they soak up the syrup, so hopefully they are softer tomorrow. I hope you enjoy eating them as much as I do. 🙂
LikeLike